How to Apply Different Colours to Elementor Heading Widget
Through the years I’ve spotted and bookmarked several websites and landing pages that just happen to use this form of styling across their web pages to create emphasis on words that are essential to properly convey their messages to visitors.
This practice when done right is guaranteed to boost desired actions from website visitors.

Like you I recently had the need to use two separate colours within Elementor heading widget, and while this is relatively easy to do using the Text Editor Widget, Elementor by default doesn’t give us this ability just yet with the Heading widget.
So, I’d walk you through how I was able to achieve this using a simple line of code around my target keywords without the need for an additional plugin.
Elementor Heading Dual Colors Using HTML Tag
I’d assume you’ve already added and styled a heading widget within the design editor.
For the sake of this demonstration, I’d be using the sentence,
“How To Use Dual Colors Elementor Heading”.
Considering you’ve made all the necessary changes to the text heading. We'd have to return to the content tab to highlight the word(s) we’d like to have its colors changed.
Just before I introduce the HTML tags we’d be using here, it’s important I indicate that “Dual Colors” are my target keywords to be highlighted for this demonstration.

Getting started, allow me to introduce the first HTML tag <span> we’d be using at the start of our focus keywords “Dual Colors”.
So we'd begin by adding the HTML tag <span> at the start of the first word “Dual” and the second HTML tag </span> just after the second or last target word “Colors”.

To recap, we basically, added the HTML tag <span> before the first target word and closed it off with </span> for the last target word.
Essentially, what these HTML tags do is group the enclosed set of characters or words specifically for styling – in this case coloring.
Having mentioned that, allow me to introduce the next piece of HTML tag that controls the colors style=”color:#colorhexcode;”
style=”color:#colorhexcode;”
What this does is helps us to effect the change of colors in accordance with the color hex code we specified.
For example; say I wanted to use the color hex code #FFCF3D to achieve a bold yellow color, I'd simply need to use the HTML tag style=”color: #FFCF3D;”
With that said, what’s left now is to insert this HTML tag right into the first HTML Tag <Span> so you’d want to leave a space right after the word “span” <span > before inserting the color styling HTML Tag, and that should give us a complete HTML tag of;
<span style=”color:#FFCF3D;’>
With this defining our first HTML Tag, the closing tag still remains constant </span>
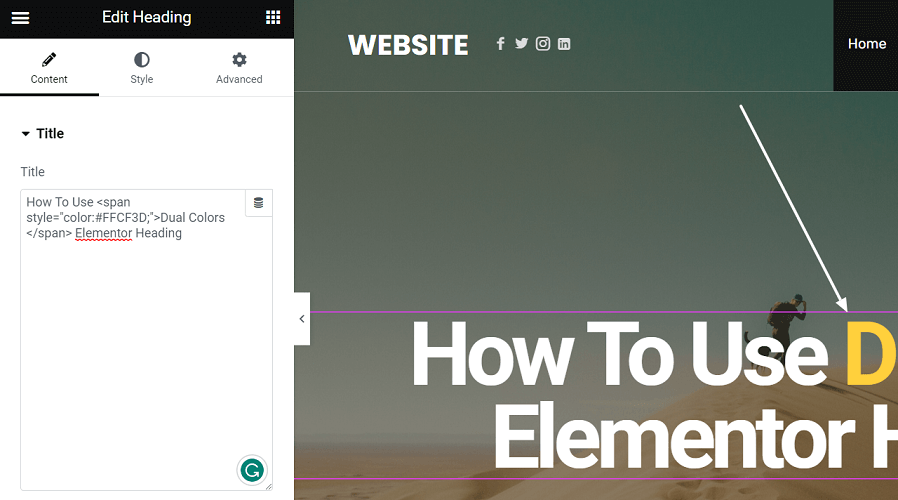
So, when we put everything together this would be the exact text I’d have left in my Heading Widget
“How To Use <span style=”color:#FFCF3D;’>Dual Colors</span> Elementor Heading.”
Where I’ve applied the styling HTML Tag around just “Dual Colors”
Lastly, I've attached the full HTML tag, including the target words “Target Keyword”
So, you can the HTML Tag below to insert into your Heading widget and make desired changes to the color hex code and wordings.
<span style=’color:#FFCF3D;’>Target keyword</span>
Conclusion
Can I apply this HTML tag to more than one part of Elementor heading widget?
The answer is Yes you can without problems.
You just have to make sure to close the HTML tag using </span> before opening another.
Got additional questions, please feel free to leave them in the comments below and I’d be sure to attend to them.